Monday, 31 October 2011

Fingers and right arm.

The hands would not be as laborious to rig as the female model that came with the tutorial, primarily because I only had two big fingers and a thumb to rig.
This stage was just a matter of fitting the joints in the fingers and thumb, and then aligning them correctly in the top, front and side views.

Once that was done, I now had to parent these fingers to the wrist to make the hand.  In order to emphasise the grip in the fist, I decided to add an extra joint, called the leftHandPalm, which is marked by the pivot here.  This should hopefully make the range of movement in this hand greater.
As for the right arm, I could have mirrored the joints of the left arm, but I think that this may have caused problems when it came to binding the skin, as demonstrated a few posts back.
I decided to build the right arm from scratch and to try and make resemble the left arm joints as closely as possible.  I think this would also be good practice as I could get the hang of building arms, complete with IK/FK handles and controls.

Building the arms for the alien

This is an area where I tend to fall short when I'm rigging, so when it came to putting the joints in the arms, as well of the relevant controls, I would have to follow the relevant part of the Digital-Tutors tutorial to the letter.
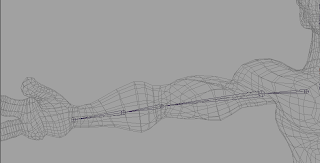
 I initially started with three joints for the shoulder elbow, but I remembered to put another in the forearm, as I would need to set the IK handle here and then extend the effector to the wrist.  This is because the IK would only need to affect up to the forearm, as the wrist would have its own controls; however, at the same time, all the controls would need to be at the wrist in order to make it easier for the animator to operate.
Of course, I will now need to make sure that these joints are inside the arm and also positioned in a way that it wil bend accurately.  In this video, I found that the joint was actually outside the arm, so I just repositioned the joints, similarly to how I did the leg.  See this video.
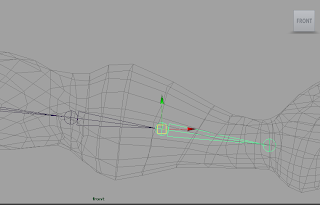
Another important part was to make sure that the local joint rotations were all in order and that they were all straight.  I did this by hitting Fn and F8 to check the rotations of the joints.  As you see below, all of the joints in the forearm are straight as they are all aligned with the X, Y and Z axis perfectly.
 The fingers, on the other hand, were a little out of line and had to be rotated slightly so that they could be as in line as possible.
 Checking the local rotations was something that I got the hang of fairly quickly, the next stage was to insert an IK handle to create that bend.  The bending point would have to be in the elbow, but the wrist would have to be free to move by itself.  Therefore the effector could only affect from the shoulder to the forearm.
How I did this was by clicking the starting point at the shoulder and then clicking the forearm to insert the handle.  Even though this handle was not going to impact on the wrist, it would need to be located at the wrist; as all of the controls for this arm would need to be based there.

In this video, you will see me relocating the effector to the wrist, using the Hypergraph.
Now, I can use the IK handle to move and bend the arm.  It is an IKRP so this means I can rotate the arm in several directions.
 Before moving on to the next stage, I needed to create some controllers that I would constrain a little later.  This wrist control, which will be used for moving the arm in IK mode was made simply by importing another cube and reshaping.
 I needed a shoulder control to move the shoulder up and down, so I just created this S curve using the same method I used for the Pole Vectors in the leg.

Thursday, 27 October 2011

Neck Control for alien

This stage was actually a bit further on, but I felt confident enough to do it straight away.  I created a NURBS curve control for the neck.  I then placed an IK handle in the neck so it could move independently of the back.  In order to make the head rotate, I contained both the skull and head base joint to the neck control with an Orient constraint.  Here is a video of this in action.

Twist

The chest control was prepared for translating the upper back in any direction, but it was not yet capable of creating a twist in the back.  In order to do this, I used the connection editor to create a connection between one of the attributes of the chest control and the twist attribute of the IK Spline Handle that I created early on.

I loaded the chest control as the output and the IK spline handle as the input.  In order to create the connection, I selected Rotate Y from the chest control list, as this was the most appropriate attribute for influencing the twist, as the twist of the spine moves on the Y axis.  I selected twist from the list of attributes of the IK spline handle.
 Now, when I adjust the Rotate Y attribute of the chest control, the spine twists around naturally.

Controls for the joints

Just as I did for the legs, I needed to create some controls for the clusters and joints in the upper body so that the animator would not need fiddle with them to animate.

Rather than create a control out of curves from scratch, I decided to import on that I made earlier.
It was simply a linear NURBS cube, which is ideal for creating controls as it does not render.  I snapped the cube to the chest joint and then scaled it out.
I then moved the vertices so that the control fit around his chest more comfortably.
The hip control, which needed to be produced next, was created simply by duplicating the chest control, snapping it to the root and then reshaping it with the vertices and of course, never forgetting, freezing the transformations.
Next were the abs control and hip sway, the latter of which would sit within the hip control.  These were both created from NURBS circles.  The Hip sway was shaped simply by going into Vertex Mode, selecting every other vertice and scaling in.
 The arrow, which would control the position of the upper back, was created using the CV Curve tool which was set to linear mode, to give it a rigid look.
Finally, I constrained all these controls to the relevant clusters using a Point orient.  The root joint was constrained to the Hip control using a Parent constraint, as I wanted it to stay in its own place, but still follow the Hip control if need be.  This is a video to illustrate me constraining all the relevant joints and clusters and then testing the controls.  I created a layer called DO_NOT_TOUCH, for anything that I do not want the animators to mess with.
I then parented all of the controls to the Hip control, meaning that if I dragged the Hip control around, the rest of the upper body follows.

Wednesday, 26 October 2011

Rigging the spine and IK Spline Handle

With both legs done, the next stage was to create the root joint and the joints that constitue the back, neck and head directly from that.
For this particular stage, I decided to stick to the tutorial by the letter, mainly because the upper chest, along with the right arm caused some problems the first time that I attempted rigging.  I will need to look out and see what I did wrong and how I could correct it.

After I put in the joints including the root, hip, back, chest, neck and head, I added an IK Spline Handle, a handle which functions similarly to an IK handle, but with the main difference being that it has points all along the handle that control the curve of the joints.  Whereas an IK handle will only allow joints to bend or curve in one consistent shape, a spline handle allows there to be variation.
In order to manipulate these joints, it would not be practical to adjust every tiny point on the spline handle and indeed not the joints themselves, so for each of the points on the IK Spline Handle, I created clusters, which I then translated out against along the back.  This meant that I could manipulate the shape of the spine by controlling these clusters along the back.
Lastly, I parented these clusters to the root joint so that I could move the whole rig by the root joint.  I then parented the two legs to the hip joint so that the entire rig was intact.  Here is how the whole alien rig looks now.
Here is a video to demonstrate what I can do with this rig after everything that I have done so far.

Setting driven keys for the alien

Setting driven keys was something that I had some success with in the second year, particularly the face of the Cornelius character in the first Industry Exercises unit.  Now, was going to attempt this with this feet rig.  This was going to be a little more complicated than when I was merely following the tutorial, mainly because I was now working with a larger number of joints.  Setting the driven keys was also going to prove whether or not the rather elaborate reverse control would work.
In order to set driven keys, I need a driver and the driven.  The driver in this case would be the curve the I produced for the foot.  This would both control the leg by the IK handle, and also control the natural roll and bend of the foot; thus making the animator's job easier.

Beginning with the left foot, how I did this was by selecting each of the joints of the reverse control individually, and then choosing Set Driven Key from the Animate Menu.  All of the joints in the reverse control were listed as the driven, meaning that their action would be influenced by which ever component I chose to be the driver.  I selected the curve and set this as the driver; this would be where the Foot Roll attribute that I mentioned in the previous post would come in to role.

I selected the Foot Roll as the attribute that would influence any attributes that I selected for the joints.  In each of the joints, I selected the Rotate Z attribute to be influenced by the Foot Roll attribute.  I keyed them at 0 to establish the driver and driven relation ship; next I moved the Foot Roll attributed to 10 and I lifted the the foot forward by the toe and keyed.  A few of the toes had become low, so I fixed this by translating them up on the X axis and then keying them to the driver.

In order to make the foot movement more natural and not just a straight line, I keyframed the toes at 5, meaning that they will not move before the Foot Roll is set between 5 and 10.  This resulted in a natural foot movement in which the ankle and ball bend first and then the toes follow.

As for the -10 of the Foot Roll, this was fairly simple.  I just rotated the Base of the reverse control back and keyed them both at -10.  I made the leg go pretty far back, as I would like this alien to have quite flexible joints.
I repeated all of these steps on the right foot.

Just as a recap of what I have done with the legs, here is a video of the progress that I have made so far.

Tuesday, 25 October 2011

Mirror joints and pole vectors

In order to create the right leg, I decided to mirror the joints in the left, rather than just reconstruct the whole thing from scratch.  I did this by selecting the entire set of joints from the hip; and then selecting 'Mirror Joint' from the Skeleton menu.
I reflected the joints on the YZ axis.  There was also an automated option of replacing a word with another, meaning that with this new leg, I could instantly replace every occurrence of the word left with the word, right.

Next, I mirrored the reverse control, using the same method.  I added each set of controls to its own layer.
After this was done, I created a curve around the left foot which would serve as the Foot Control; I added another attribute called a Foot Roll, which would come in useful later.  I altered the shape of the Foot Control, so that it had the same outline as the foot itself.  I then duplicated this and flipped it around to the right foot.

The last thing that I shall mention in this post are the locators; they were made by creating curves shaped like the letters l and r.  I moved these to the left and right legs and then constrained them as pole vectors to the IK handles in the legs.  They can now control the orientation of the knees.

Monday, 24 October 2011

Reverse control in foot of alien

The Digital Tutors tutorial demonstrated a very simple means of creating a reverse control for a foot which involved creating a base joint at the heel, then a joint at the toe; but then going back and creating one at the ball and one at the ankle.  This would allow the animator to rotate the foot up and down, either by the heel or toe.

However, with the alien's foot, I had far more joints that I would need to control using the reverse controller.
I started at the reverse control at the heel, as the tutorial had stated, but then once I got to the toe joint, I had to go back and create joints in the reverse control for the middle of the toe, the bend, the foot and finally the ankle.
From the foot joint of the reverse control, I then created a joint to the outer toe and then its respective joints, and then another one from the outer toe bend joint to the middle toe and all of its respective child joints.

I found that this was going to be problematic when trying to rotate the foot on the toe as it would only effect the inner toe.  So because of this I decided to reparent the middle and outer toe RL joints to the foot RL joints.  In order to make the foot and reverse control match, I decided to reparent the outer toe on the foot to the foot joint.
Here is a demonstration of how the Reverse Control moves now, on both the base joint and the inner toe joint.
The next part was to create an IK handle for the leg that ran from the hip to the ankle, and also to create IK Handles for each of the joints in the foot, which would then be parented to the corresponding joints in the Reverse Control.  Here is a video of me parenting the newly created IK handles to the reverse control and also creating a few new ones in order to make the foot move more evenly.

Leg and Foot for Alien

The first stage of rigging this creature was to create the legs of the creature.  In the past, I had normally begun from the root joint, but I know now that it makes more sense to rig the legs separately and parent them to a root joint later on, as this would mean they would be symmetrical to one another.
I created joints in the left hip, knee, ankle, foot and a placed two joints in the inner toe.  I have decided to refer to the alien's toes as inner, middle and outer; as opposed to left, middle and right for reasons that shall become more clear later on.  I made sure that the knee joint was slightly in front on the Z axis and the ankle was slightly behind to give it that bend.

Rigging of the toes was a fairly fun job; whether they will work well remains to be seen, but I think that having a bit of bend and curl in the individual toes would look veyr nice when it came to animating, particularly walk cycles.
The inner and middle toe joints that stick out in front were created directly from the foot joint, whereas the outer toe joints were created from the ankle as this toe was closer to the back of the foot.  This outer toe also has fewer joints than the other two toes, as it is smaller and would thus make less movement, much like a thumb.

After revising the placement of the joints in this foot, I decided that it would make sense to create an extra joint, between the toe and foot joints in both the inner and middle toes.  The reason for this was that  having the toe joint directly to the foot could have meant that there would be too much influence on the mesh from two joints, meaning that both toes would bend abnormally, even if you only keyframed one to bend.

To do this, I disconnected the two joints and this automatically created two new joints in their place.  I parented the toe joints to these new joints and then moved them around so that both toes consisted on three joints; one at the foot, one in the middle toe joint and one right at the end of the toe.
In the next post, I shall go into how I created the drivers to give this foot some bend, curl and roll.

Rigging an alien

I have still struggled to figure out why the left arm of the rig I was constructing was causing so much issue when it came to binding the model to the rig.  I attempted to reconstruct the left arm but when I moved it, the elbow joint started moving very erratically.   Furthermore, I was unable to parent the joint in between the elbow and the wrist.

I have decided to start the tutorial again, and I will just do anything that I remember or feel confident with doing, by myself and anything that I do not remember, I will look at the tutorial videos.

Rather than simply rigging the model that came with the tutorial from scratch, I have decided that it will be a better use of my time if I attempted to rig a different character model; a model that would still be humanoid, but would be challenging enough for me to apply my knowledge and learn what I did wrong and what I did correctly before.

Through browsing the web site, SimplyMaya.com, I came across this alien character, which was modelled by a user called Pizzicat.
This character is fairly simple and not too different in shape from the model that I began rigging previously.  However, there are some quite good opportunities here to apply my rigging skills in quite creative ways, namely his hands and feet, which comprise of three long fingers and long toes respectively.  This will allow me to be quite inventive about the placement of joints in these parts, particularly the toes, as the previous model only consisted of a foot without the toes modelled.

Furthermore, I will get the opportunity to experiment with some blend shaping in the face of this character.

The first thing that I will do before rigging this alien is to select the Geometry and then delete the history.  This is because a lot of modellers that I have worked with have often forgotten to do this, despite the fact that it is a fundamental rule of modelling.  I have done this, just to avoid any major issues later on in the process.

Over the next few posts, I shall document the progress that I make with applying a rig to this model.

Saturday, 22 October 2011

Fully coloured Emperor Design

As promised in the previous post, here is a fully coloured character design for the Emperor.  I drew this in Photoshop and I also installed some Watercolour-style brushes to colour it in, which is why this image has the slight look of a watercolour image.  Obviously, the only way to really achieve the look of watercolour paint is to actually do it, but I felt that doing this digitally would give me more opportunity to experiment with colour.
I decided to go for a yellow, green and red colour scheme.  I borrowed colours and patterns from several images of the Jade Emperor and then combined them to create my own character.    Obviously, I will soon need to incorporate more patterns into the design of the character as he does look somewhat plain at the moment, and I also would like to try out other colour schemes and combinations as I develop the design.

Emperor Character Designs

Here are some sketches that I have done for the Emperor character.  In all of these, I stuck to the iconic image of the long moustache and beard, along with the draping robe; but I have tried to experiment with variations such as hat size and also age, weight and height.

This is one of the first sketches that I did when I was practicing drawing out the Emperor character and getting a feel for how he should look.

This is another fairly early sketch.  The Emperor is supposed to be a fairly enlightened character and I tried to portray him here as he was addressing his crowd and elaborating on how difficult this race will be, along with how only the greatest and most determined animals can win.

This is one of my favourite drawings of the Emperor, I also did a colour version of this drawing that I shall post up in the next blog post.  I got the hang of drawing the bearded and robed emperor, so now I started experimenting with the style of the character and bringing out specific traits.  I think I was trying to portray him as he was congratulating the winners of the race in this image; I also needed to convey that this is a joyful character.

In this sketch, I was trying to make him seem a bit more modest; he is joyful in nature, but he also exercises some discipline and self-restraint, that an emperor typically exercises in public life.  I also drew this to figure out how his clothing should sit on his body, particularly on his arms.

In the previous images, I had drawn the emperor a short, chubby and jolly; in this one, I tried to determine what he would look like if his appearance was more mature and what he would look like if he was tougher.
I considered the possibility of having quite a technically accurate and stiffened character design, against the more cute and caricatured designs of the animals; much like with the Sorcerer and Mickey Mouse in the Scourer's Apprentice segment of the 1940 film, Fantasia.   However, when I discussed this with the rest of the group, we decided on the short, chubby and cheery portrayal, so I continued doing character designs for that.

Here is another drawing that I did in the style that I had established a few drawings back.  In this one, I portrayed him declaring his congratulations to the winning animals.  I am quite pleased with the pose in this one as I like how the right half of the Emperor's body is animated and joyous as he is congratulatory, but the left half of his body is more stiff and reserved.

Lastly, here is a concept drawing I did of the Emperor shaking hands with the rat after coming first place.  I had done several standing poses, so I drew this one to figure out how he will look bending down to shake the rat's hand and also how robe moves as he moves.
From this sketching, I have decided that I will probably portray this character as more human and slightly less like a deity.  When I wrote the screenplay, I had a more human and authentic emperor in mind; one that is joyful and happy, but also fairly austere, and this is what is what I have been trying to achieve through this sketching.

Jade Emperor reference

For the Cat and Rat Project, I have been given the task of designing the character of the Emperor.  The character in the story is loosely based on that of the Jade Emperor, the head deity of the Taoist religion.  I have collected various images of him as reference for when I draw up the character design.


The Jade Emperor is portrayed wearing clothing of very different colour schemes in every image; but they all seem to have either red, yellow or green.  The Jade Emperor is virtually always portrayed sitting down; when I wrote the screenplay, I did give him some walking and standing actions.  I will probably retain the walking and standing as that will allow for greater animation opportunities.

My character designs for the Emperor character are to follow.