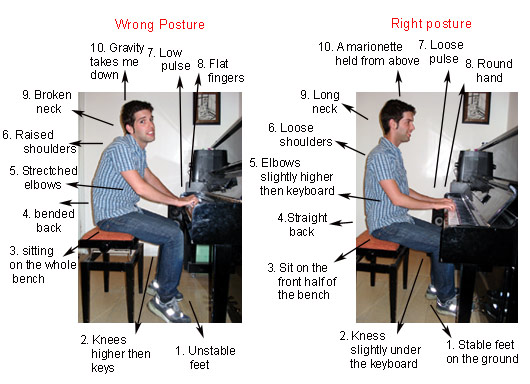
I think I will need to have a little more bounce when she moves up the chair and adapts the posture for playing the piano. For reference on how she should sit at the piano, I have been looking at correct posture for sitting at a piano.
Welcome to my BA Level 3 blog. To view the posts for a specific unit, please click on one of the links in the navigation menu below
Monday, 16 April 2012
Shot 8 - Block out
Here is a playblast of the block out for shot 8 of the film Synaesthesia so far; where she approaches and then sits at the piano. I have not yet animated her walk cycle. I have decided to animate her approaching the seat and then leaning on it as she sits down.
Saturday, 14 April 2012
Dog Rig in demonstration
Here is a video demonstrating the fully skinned and weighted dog for the film Fools Gold. The skeleton, controls and drivers were all constructed by me, whereas the weighting was done by Richard Eglinton.
Friday, 13 April 2012
News regarding Cat & Rat + Fools Gold Dog rig
As I stated in my last blog post, I have recently got work on two new projects in the past 2 days alone. Unfortunately, also in that space of time, the Cat and Rat project that we have been working on for the past few months has now been shut down. The reasons for this were that we had experienced too many technical issues over the second term and into the Easter Holidays, which severely hindered our productivity and creativity and caused a massive delay in our schedule by about 8 weeks. These ranged from software failure to needing to redo certain tasks (sometimes more than twice) because they may have been left undone for too long.
After having a word with our tutors, they were very honest in telling us that we will not be able to complete this film in 7 weeks to a standard that industry would like and they stated that we had three options:
- either to have a massive (and rather unrealistic) turnaround in the space of a week
- find other projects to work on and focus on creating work that displays our specialism(s)
- use the models and rigs to create a much shorter and simpler piece of work that is to the point and displays each of our abilities
I am going with the second option anyway, as I already got some more rigging work and finally a huge chunk of Animation work which I had been longing for, so I can fill up the Animation folder of my portfolio and include more recent animation on my showreel. So far, my Animation folder is the most important one out of my three folders as I am an Animator first and foremost, but as of yet, it is the smallest folder. However, this term, I am expecting that to change and I am expecting to have a lot more focus on animation this term.
As for the group that I was working with on Cat and Rat, we have unanimously decided that although the "Legend of the Chinese Zodiac" concept has now been dissolved, we will remain together as a group and try to use the rigs and models that we built to create a shorter and snappier concept and build up our portfolios.
So far, I have been working on a rig for a dog character as part of the Fools Gold project. The plan is that I build the skeleton, controls and drivers for the rig, whereas Richard will paint the weights. Here is a demonstration of the skeleton rig. At the moment, it is not bound to the dog model.
Wednesday, 11 April 2012
New projects
Even though much of the work that I have published in this blog has been Character design and Rigging, I am actually an Animator first and foremost; it is just that the Cat and Rat project has not come to the stage where we can start animating quite yet. As the third term has started, many of the projects have come to the stage to start animating so I expect that this will be my time to shine and that there is going to be a large boom of animation work available for me to do so I can build up my Portfolio, and in particular, the Animation folder of my portfolio.
I have therefore decided to do animation work for a project called Synaesthesia, which is currently being made by Valentino Lazardis and Arpit Achha. They primarily want me to do walk cycles of a 19-year-old girl who is intrigued and enraptured by the colours and patters that she sees around her, as a result of her condition. They also want a few point of view shots which consist of her hands doing things such as playing the piano and stroking a dying dog. This will amount to around 8 shots of animation; I am going to be given the relevant character rigs and the relevant environments.
This will mean that I will potentially have a broader range of work to include on my showreel for when I graduate and more films that I will be credited on.
I also potentially have another project to do work for called Fools Gold which is being directed by Richard Eglinton. He approached me after seeing the quadrupedal rigging (the Cat and the Ox) that I did for the Cat and Rat project and he has informed me that he may need me to rig a model of a dog, complete with controls and drivers. He may contact me soon when he has completed and finalised the dog model.
I have therefore decided to do animation work for a project called Synaesthesia, which is currently being made by Valentino Lazardis and Arpit Achha. They primarily want me to do walk cycles of a 19-year-old girl who is intrigued and enraptured by the colours and patters that she sees around her, as a result of her condition. They also want a few point of view shots which consist of her hands doing things such as playing the piano and stroking a dying dog. This will amount to around 8 shots of animation; I am going to be given the relevant character rigs and the relevant environments.
This will mean that I will potentially have a broader range of work to include on my showreel for when I graduate and more films that I will be credited on.
I also potentially have another project to do work for called Fools Gold which is being directed by Richard Eglinton. He approached me after seeing the quadrupedal rigging (the Cat and the Ox) that I did for the Cat and Rat project and he has informed me that he may need me to rig a model of a dog, complete with controls and drivers. He may contact me soon when he has completed and finalised the dog model.
Emperor rig demo
Here is a video to demonstrate the Emperor rig and its capabilities, including an extensive demonstration of the facial controls and customisation of the facial expressions.
Complete Ox rig demo
The rigging stage turned out to be a never ending story as we had to go over the weighting numerous times but the Ox rig is now complete and here is a video of the Ox rig in action. The Emperor rig video will be posted up shortly.
Monday, 2 April 2012
Blend shapes for Jade Emperor
I am in the process of rigging the Emperor character for the Cat and Rat film. For this character, I also needed to blend shape the facial expressions of the emperor, primarily his brows and his mouth/beard in order to create convincing and expressive animation.
Although I understand the concept of blend shaping, as well as the procedure, I have actually struggled with this quite majorly. Although it is something that has a straightforward method, it can be very hard to locate and rectify errors when they arise. I pretty much learnt how to do blend shaping properly through trial and error, perhaps the most frustrating style of learning.
One error that kept coming up was that when I produced variations of the Emperor model to be part of a blend shape, instead of the original model staying in its place, it would move into the same position as the blend shape. In addition to this, it would also make certain controls unmovable when a blend shape is turned on. I learnt that the way around this was that prior to beginning the process of blend shaping and indeed skinning, all transformations must be frozen and ALL history should be deleted so that there are no odd inputs and outputs to the model that are disrupting the blend shaping. Freezing transformation and deleting history are two fundamental elements of modelling that I have discovered that far too many modellers seem to forget about, leaving us riggers to clean it up.
Another problem that arose frequently was that when I tried setting up blend shapes at times, it was not possible under certain settings to have two blend shapes switched on at the same time. I.e. if a blend shape to make the mouth wider was switched on then it would not be possible to simultaneously raise or lower an eyebrow. I resolved this by resetting the Blend Shape settings to Front of Chain and then began making the blend shapes from scratch.
I am uncertain as to why Front of Chain permits simultaneous blend shapes and the others do not, but if I manage to figure it out, I will be sure to write a blog post about it.
As well as learning from my errors, I have also learnt how I can have numerous expressions (i.e. variations of a model that will influence how the original will alter when the blend shape is switched on) assigned to one blend shape, as opposed to having loads of blend shapes for every tiny action.
This can be done two ways, either by opening the Blend Shape window and creating a blend shape. For each expression (or part of an expression) select the original model, click "Add Base" to create a copy of the model and then alter that model to convey the expression.
The other way is to create the model from scratch and then to go to the Add Blend Shape Target Window, in which I then shift select the target model, followed by the original model and then select the relevant Blend Shape from the Existing Nodes menu. Either method will work fine.
I managed to create two blend shapes for the emperor, one for the brow movements and another for the mouth; each contains the relevant movements for their respective area of the face. I then created a driver in the neck so that the animators just have to adjust the attributes to alter the facial movement. The blend shapes of the Emperor character are demonstrated in this video.
Although I understand the concept of blend shaping, as well as the procedure, I have actually struggled with this quite majorly. Although it is something that has a straightforward method, it can be very hard to locate and rectify errors when they arise. I pretty much learnt how to do blend shaping properly through trial and error, perhaps the most frustrating style of learning.
One error that kept coming up was that when I produced variations of the Emperor model to be part of a blend shape, instead of the original model staying in its place, it would move into the same position as the blend shape. In addition to this, it would also make certain controls unmovable when a blend shape is turned on. I learnt that the way around this was that prior to beginning the process of blend shaping and indeed skinning, all transformations must be frozen and ALL history should be deleted so that there are no odd inputs and outputs to the model that are disrupting the blend shaping. Freezing transformation and deleting history are two fundamental elements of modelling that I have discovered that far too many modellers seem to forget about, leaving us riggers to clean it up.
Another problem that arose frequently was that when I tried setting up blend shapes at times, it was not possible under certain settings to have two blend shapes switched on at the same time. I.e. if a blend shape to make the mouth wider was switched on then it would not be possible to simultaneously raise or lower an eyebrow. I resolved this by resetting the Blend Shape settings to Front of Chain and then began making the blend shapes from scratch.
I am uncertain as to why Front of Chain permits simultaneous blend shapes and the others do not, but if I manage to figure it out, I will be sure to write a blog post about it.
As well as learning from my errors, I have also learnt how I can have numerous expressions (i.e. variations of a model that will influence how the original will alter when the blend shape is switched on) assigned to one blend shape, as opposed to having loads of blend shapes for every tiny action.
This can be done two ways, either by opening the Blend Shape window and creating a blend shape. For each expression (or part of an expression) select the original model, click "Add Base" to create a copy of the model and then alter that model to convey the expression.
The other way is to create the model from scratch and then to go to the Add Blend Shape Target Window, in which I then shift select the target model, followed by the original model and then select the relevant Blend Shape from the Existing Nodes menu. Either method will work fine.
I managed to create two blend shapes for the emperor, one for the brow movements and another for the mouth; each contains the relevant movements for their respective area of the face. I then created a driver in the neck so that the animators just have to adjust the attributes to alter the facial movement. The blend shapes of the Emperor character are demonstrated in this video.
Subscribe to:
Posts (Atom)

