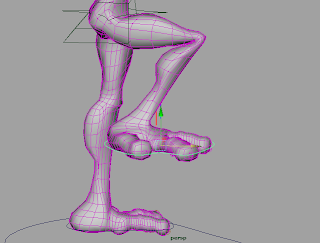
I have already mention the painting weights tool as a means of increasing or decreasing the influence that the rig has on the geometry of a model. However, using painting weights alone is not always the most proficient means of setting up the physicality of a character rig, as it is very fiddly. The tutorial has introduced me to the component editor. This allows me to remove relationships that vertices have with certain joints if they are not supposed to be there; for example, if the foot joint of the right foot, causes some of the vertices on the left foot to move as well.
When I life up this foot and then rotate it on the X axis, you will see that the heel actually caves in on itself.In order to fix this and retain that nice curve in the heel when the foot rotates, I selected the vertices of the offending area and then I selected the Component Editor. For the right foot joint, I just selected all of the vertices and set the values to 0, thus removing a large amount of excess influence that this joint had.
Here is how both the alien's feet look now, a nice curve in the foot, no matter how they bend. Also, please not that the feet are not actually colliding into one another, that is merely the angle that I took the screenshot from
Next, I shall use the component editor to sort out the sway of the hip. If you observe this very basic keyframe animation that I produced to test the movement, you will see that a lot of vertices clash into one another as the hip sways from side to side.
In order to resolve this, I went into front view and I selected several vertices around the crotch area that were colliding into one another.
I opened the component editor and as you can see below, the root joint was having a profound amount influence over these vertices.In order to resolve this I selected all of vertices under the ROOT column and set the values to 0. This now meant that when I moved the hip sway control, the vertices would no longer cave in on one another. You can see that being demonstrated in this video below.
Now, the hips moved very functionally; the next stage was to emphasise the hip sway, through the use of the painting weights tool. Now, I discovered a workflow of binding skin to a rig, which was to fix all the main problems using the component editor, but then to go over it and really give the character some expression by manually painting weights on.


No comments:
Post a Comment